So, I got a call from a friend, and she said her car does not start. Knowing her car, the first thing I thought was a battery, then after talking to her, I thought of the starter. Since she was in Cincinnati, and her car was getting towed to a shop, I told her to get a diagnostics and get the estimate.
The diagnostics came back as a bad starter, and the estimate was close to $400. Her choice was obvious, comparing that to DIY with AutoZone Starter for $120 (or even for cheaper if you buy them online), and luckily she had a free towing back to town… I told her to tow the car to my place, and I was getting my camera ready to make this DIY.
At 6:00 PM towing truck brought her car to my driveway. It was already starting to get dark, but needed to go to AutoZone to pick up the new starter. And at this point, I was already totally forgot about the DIY and taking pictures for this…
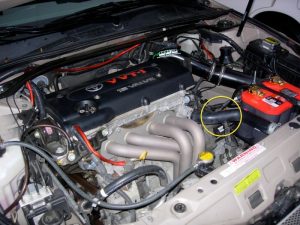
Her car is 2002 Toyota Camry, which has the same engine as my previous car, 2004 Solara, and I’m kind of familiar with her engine bay. Also since I forgot to take ANY pictures for this DIY, I’m using a couple pictures of my Solara, just to show the starter locations.

Tools You Need
- 10mm, 12mm, 14mm Sockets
, ratchet
- 10mm open wrench
- Small Flathead Driver
Step by Step Instructions
The bolt size may be wrong.. it’s from my memory and I’m not known for a strong memory…
- Using 10mm open wrench, disconnect the battery
- Remove the 10mm bolt and loosen the 10mm nut, which holding the battery holder, then remove the battery holder
- Remove the battery, and a plastic tray under the battery
- Remove Air Intake Box
- Loosen two bolts holding the upper casing to the bottom casing (10mm)
- Loosen the clamp holing the intake tube, then wiggle the intake tube off
- there is a Vacuum hose connected to the upper casing, pinch the clamp, then remove the vacuum hose. be careful not to break the plastic nipple.
- Once the upper casing is off, put it aside with the intake filter
- Using a small flathead, open two plastic clamps holding electric wiring
- Using 10mm Socket with extensions, remove the 3 bolts at the bottom of the intake box
- wiggle the box off from the intake snorkel
- Remove 2 10mm bolts holding the metal stay that holds the intake box (under the battery tray was)
- Remove 2 10mm bolts holding the intake snorkel, and remove the snorkel
- Removing Starter
- Remove Negative connecter
- Using 12mm socket, remove a nut under the red rubber cover, holding the positive wire
- Using 14mm socket with extension, remove two bolts holding the starter, then pull the starter out
- Put everything back together in reverse order
- When you put the starter back on, it will be easier if you use the bolt as a guide to straighten the starter
- Torque Spec for the stater bolt is 27ft-lb
by the time we finished putting everything away, washing my hand, and called my wife, it was just passed 7:30. Considering the trip to the AutoZone, I think the actual time it took us was at most 1 hour. considering the work done out in dark driveway, it was not that bad.
Wish I remembered to take pictures.. but well, it should be straight forward enough.