Simple, Free, and very easy to use Digital Signage…
Our school was using FourWinds Digital signage for last few years. They are feature rich, but a bit complicated, and $$$. When we have any trouble with the system, there were nothing much we can do other than call in a ticket and wait for it to be resolved. Also how we use the digital signage was non-interactive, and not so content rich anyways. Like most other digital signage, we were basically using it as a looping slideshow.
After some research, I decided to go for a free solution. Long story short, my solution is a combination of Google Slides, HTML page, and computers in Kiosk Mode.
This is just a note for myself in the future if in need to go back and see what I did, but also for those who may be seeking for a free digital signage solutions.
Step 1: Google Slides
First, you need to crate a slide show of what you want to show on your digital signage. If you don’t have google account, create one, and go to google slides. It works just like MS Powerpoint. Remember, don’t be too wordy. Something eye catching images, with one or two short sentences would be good.
Google slide gives you an option to publish your slide show on web. When you “publish to the web” it will generate URL where you can point your web browser, and by going to Embed tab, it will create code that you can copy and paste to an html file. Make sure to check the box for “Start slideshow….” and “Restart the slideshow”, so that it will auto-start, and also to loop.
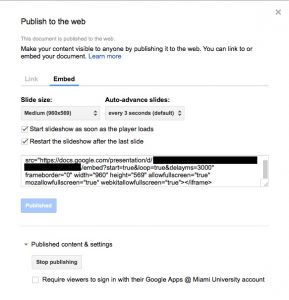
<iframe src="https://docs.google.com/presentation/d/UNIQUE_ADDRESS/embed?start=true&loop=true&delayms=3000" frameborder="0" width="960" height="569" allowfullscreen="true" mozallowfullscreen="true" webkitallowfullscreen="true"></iframe>
The important piece here is delayms=3000, and width=”960″ height=”569″.
The delayms is duration of each slide in milliseconds. 3000ms=3seconds. You can always change the number by using pull down menu, but it’s easier just to change the number in the code once you finish setting up the page.
The width and height is obviously the height of the slideshow.
step 2: HTML
I could simply use the URL that google create for the signage, but I could foresee some issues doing so.
First, when you are updating the digital signage, google automatically saves so often, and whatever saved will be immediately go online on the slideshow. Since you don’t want to have half edited show to go online, you need to have some control over when the slide should be updated.
Second, I wanted to be able to switch multiple version of slideshow easily without accessing multiple digital signage client units.
By creating html file (or webpage) I could create work around for above two issues very easily. Here’s the sample HTML file that I created, and placed on local server.
<html> <head> <script language="javascript"> function refreshAt(hours, minutes, seconds) { var now = new Date(); var then = new Date(); if(now.getHours() > hours || (now.getHours() == hours && now.getMinutes() > minutes) || now.getHours() == hours && now.getMinutes() == minutes && now.getSeconds() >= seconds) { then.setDate(now.getDate() + 1); } then.setHours(hours); then.setMinutes(minutes); then.setSeconds(seconds); var timeout = (then.getTime() - now.getTime()); setTimeout(function() { window.location.reload(true); }, timeout); } refreshAt(06,00,0); //Will refresh the page at 6:00am </script> <meta http-equiv="refresh" content="216000" /> <!-- This will refresh page in every 6 hours, in seconds, change content= x to refresh page after x seconds --> <style type="text/css"> #nocursor { position: absolute; top: 20px; left: 20px; z-index: 10000; cursor: none, url(backend/1x1.png),text; } </style> <!--This suppose to hide cursor... don't know if it's working--> </head> <body> <div> <iframe src="https://docs.google.com/presentation/d/UNIQUEADDRESS/embed?start=true&loop=true&delayms=8000" frameborder="0" width="100%" height="100%" allowfullscreen="true" mozallowfullscreen="true" webkitallowfullscreen="true"></iframe> <div id="nocursor"> </div> </div> </body> </html>
This HTML file is made of 3 part. In header, the Javascript is used to refresh the page 6:00AM every morning. and then every 6 hours after that.
The second part is to hide cursor. This may or may not be necessary depending on browser and for the kiosk mode. and to be honest, I don’t know how we’ll it’s working……
Finally in the body, Google Slides iFrame with “NoCursor” style. Notice that I have changed the delayms= to 8000 (8seconds), and also the width and the heigh to 100%. In this way, the each slide will be displayed for 8 seconds and also the slide will go full screen regardless of the monitor’s resolution.
Name this HTML File as “DigitalSignage.html” and save it to a network file location (if you will access from multiple signage, or just on local folder of digital signage computer if only one.
Step 3: Computer in Kiosk Mode
We already had Intel NUC that we were using for the FourWinds system, so I simply re-image the machine and repurpose for this new system. There were a few steps that I needed to take to prepare them for the digital signage.
- Image computer with windows, and with Chrome Web browser
- Turn on “Autostart after Power failure” under bios (on most computers)
- Power Setting: under control panel, make sure the computer or screen won’t go into sleep.
- Create local standard user (DigitalSignage) with password
- Set Automatic Login (Please read detail HERE)
- Create “DefaultUserName”,”DefaultPassword”, and “AutoAdminLogon” entry under “Regedit”
- Login to the “DigitalSignage” account, and then create “Chrome Kiosk Mode Shortcut”
- Create a desktop shortcut for chrome
- Right click on the shortcut and open properties
- In the “Target” field, add –kiosk “Z:\File\Location\Of\The\HTML\File\DigitalSignage.html”
- Test the shortcut by double clicking… You can get out of kiosk mode by CTRL+W
- Press Windowskey+”R” to open “run” window, and type shell:startup (this will open start up item folder), and copy above shortcut
- restart the computer and make sure it will auto login, and then automatically start the chrome in kiosk mode with the google slide!
This is very simple solution, and can be adopted to many different usage.
I created multiple versions of HTML files for multiple slide show (digitalsignage1.html, digitalsignage2.html, etc), and placed it on a network drive that I can access remotely. Since client computers (the Intel NUC connected on each display) is always pointing to the “DigitalSignage.html”, if I want to switch the slideshow temporarily, all I need to do is change the name of one i want to use to “DigitalSignage.html”. every 6 hours, the page will automatically refresh, so at the next refresh it will grab the new slide show.
I also setup an iPad for the kiosk as well.
- Turn on Guided Access and set passcode under General>Accessibility>Guided Access
- Download “Kiosk Pro Lite“
- set content to the HTML file (needs to be accessible through web) and also limit the domain to your own as well as docs.google.com
On iPad, the user can swipe to fast forward and go back each slide if they miss any info on the digital signage.
As I wrote earlier this is a memo for myself, but if you are interested in and have any question, please feel free to contact me for more details. I’m more than happy to help!