Clutch
At last couple autocross events, my co-drivers told me that my clutch seems to be wearing out, and also my garage happened to be available for me to use (my garage has been my friend’s workshop for last couple months…), I decided to tackle the big job!
I debated between Mazda Value clutch kit and full OEM clutch/pressure plate/bearings, but after considering the price, and use of my car (autocross), I decided to go with regular OEM parts. If it were for my watermelon (mainly daily drive) I’d go with value kit for its price. After all, it is the kit that used by most dealerships when they change clutch for miata.
Also while my car’s up and transmission is out, I changed rear main seal and front and rear transmission seal, as well as clutch master, slave cylinders.
I will not do any step by step as it is a well documented procedures, but a couple notes I’d like to add…
First, and important one is take pictures of how clutch line, electric line and any other component you disconnect or unplug. It took me forever plus a friends help to get the things routed and bolted right after transmission is mounted.
Another thing is to have two 12-1.5 bolts cut off. In that way you can screw in the headless bolt to the engine block and use it as a guide to mount transmission.
After clutch change, car drives well. And also due to cleaned up clutch line (I flashed) and new master/slave cylinders, the clutch feels so much lighter, even though the original one was also a stock clutch/pressure plate. So far it’s been great. 🙂
Exhaust
Another thing I did was changing my exhaust. My original exhaust was in pretty bad shape, so was due for replacement. I decided (after a strong push from my friend) to try aluminum cat back. Of course there’s no off-shelf aluminum one, so I needed to build my own.
I’m just a beginner welder, so please excuse my ugly weld. It doesn’t leak (much), and seem it’s holding up fairly strong.
First, I cut off the stock mid pipe after resonator. With SCCA ES regulation, I could cut out the resonator as well, but I didn’t want it to be too loud, and I’m pretty happy with the result with resonator.
I bought 2″ to 2.5″ reducer (Like this, but probably cheaper at autozone for not so fancy regular steel one…), and welded on a steel v-band flange.
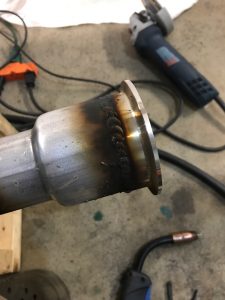
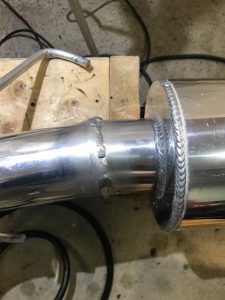
Somehow, this weld was very smoked for some reason…
On the aluminum side, I also bought a v-band (I ended up buying form a ebay seller who said their steel and aluminum flange has the same dimension) so that you can clamp steel side (OEM) and aluminum side using a simple v-band clamp. For the piping for the aluminum exhaust tubing, I picked up a 2mm thick intercooler piping kit. Many intercooler piping kit uses thinner gauge aluminum, and I feel 2mm is minimum thickness I had to have, especially because of my welding situation. One, I’m not experienced welder, and two, I only got a Mig welder with a spool gun…

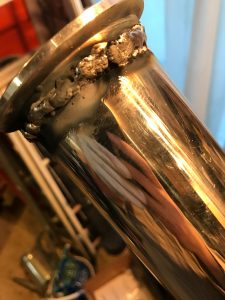
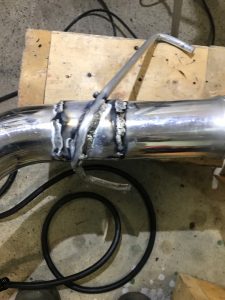
Welding aluminum with spool gun on pipe was a much harder than I expected. I practiced a bit on some cut off piece of piping, but was too afraid of burning through, and also didn’t have enough gas flow, caused this lumpy ugly weld… (I ended up grinding some but didn’t see any leak from this to my surprise!)
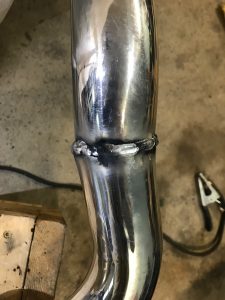
It is tidious and time consuming, but it’s pretty simple process to make a custom exhaust. starting from the front side, I test fit one pipe at a time, figuring out how to fit, cut, test fit, cut more, tack weld, and then weld. Then repeat the process for each bends…
Since butt welding aluminum with mig spool gun was impossibly hard, I used a pipe expander to flare the end of pipe, so that I can filet weld instead. (And it was still so hard… )
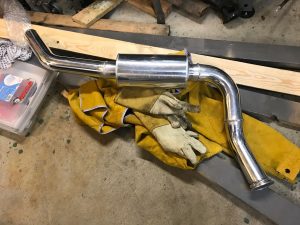
I used Vibrant 2.5″ Aluminum Muffler, as it was pretty much the only option available, and even that is discontinued and what you find online (or at a store) is what its left…. (I’m even considering getting one extra just in case… )
As I progress, I think I got a little better at welding, but it is still so hard, if you do just a little wrong, it gets very ugly pretty quick… and also I burned the tip a couple times….
For the hunger, I picked up a aluminum rod and used vice and a brute force to bend in to the shape. (The truth is that aluminum rod I’d quite soft so it’s pretty easy to bend in to the shape…). Also I cut out a left over piping in half, and attached to the piping. In this way, stress from the hanger will be held by two layer of piping and spread across larger area.
The end result wasn’t too shabby…
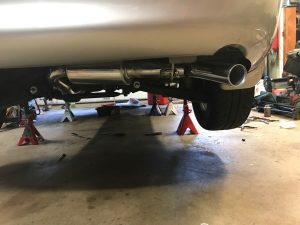
It sounds slightly louder than the stock at idle, but once you start driving, I can definitely hear it. It also has a slight drone, but this is autocross car, and I can live with it…
The pipe section I cut out plus the stock muffler weigh 25.6LB total, and the new pipe welded in is only 6LB!!
The question is how well it will hold up, but I will be reporting it at somepoint in the future… Also I will post a sound clip sometime soon!