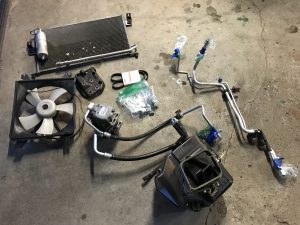
For some reason I didn’t get to make myself motivated enough to go to my cold garage to remove my AC unit from 99 Miata.
First of all, I’d like to thank Dan Hutten’s Auto Shop for a quick service of removing AC Refrigerant. Unfortunately I usually don’t take my car to a mechanic’s shop as I try to do a lot in my garage myself, but if anyone needs a service in Oxford area, I strongly recommend them. I’ve only heard a good things, except for that they are very busy 🙂
Anyhow, this is just a memo for what I did. I didn’t take any pictures as there are already plenty of instructions online.
Here are the links that helped me with step by step removal and how all the components are put together.
Miata Build Diary
Miata.net
Miata.net
Also here are the parts I ordered from Mazda for this project.
NA0161150A : AC Duct behind glove box
B61P15907B : PS belt (no ac)
018753134, 170861031, B49962868 :Firewall and trans tunnel plug
and also a flange bolt M8x1.25x45mm from nearby hardware store.
Here are a quick step by step, and some notes.
- : Take to a local mechanic and EVACUATE ALL REFRIGERANT!!!
- : Jackup the car, put on stand, remove the under carriage cover, and remove the intake.
- : Undo all the connectors on ac hard lines.
- : Disconnect electric connectors. one for AC fan, another to some sensor (on pass side), one from compressor (need to cut a couple zip ties as well)
- : Remove the top radiator support brackets, remove the radiator fan (DR side) and also the AC Fan (Pass side)
- : Pull up the radiator and pus toward the engine, so that you have some room to work on ac radiator (?)
- : Remove couple bolts holding the AC Rad.
- : wiggle the AC Rad, so that you can access the top and bottom of the canister attached, to disconnect and remove the canister.
- : While pushing the radiator toward engine, lift up the AC Rad. with all the hard line disconnected, it should be able to make its way out
- : Remove a couple bracket holding the hardline. then pull out the hardline toward under the car.
- : Remove glove box. squeeze the top, and then pull the bottom. it will just pop out.
- : Disconnect the electric connector on condenser box
- : Remove 3 phillips holding the metal brace on the bottom of the dash
- : Remove the two bands holding the condenser box’s tube
- : Remove two 10mm nuts holding the condenser box. One on top needs universal joint.
- : Back to the engine bay, and push the metal plug (connected to the hardline) through the firewall
- : From inside of the car, pull out the condenser box.
- : Place the AC Duct pipe in place. (I needed to find a some push pin type plug to place on tube to hold it in place.)
- : Put the brace back in place, put back the glove box, and tape up the electric connector on side
- : Remove the front sway bar. This was not on the instruction, but necessary in my case.
- : Push radiator all the forward to make some room to work on compressor
- : Loosen the PS belt tensioner. 3 bolts on tensioner itself, and 1 behind the pulley. turn starter to spin the pulley so that you can access the one behind the pulley
- : Remove the belt PS/AC belt
- : Remove 4 bolts holding AC Compressor (two from top and two from bottom. do the top one first, so that you can hold compressor from bottom while removing last two bolts.
- : Remove the compressor. Careful not to hit the radiator, etc.
- : Remove the compressor bracket. 4 bolts behind the compressor, and one from the front. Replace the front bolt with the new M8x1.25x45mm bolt.
- : Place the new shorter PS belt.
- : Tighten the PS belt.
- : Put rest of the car back together
Here are all the stuff came out of my car, and it is for sale, if anyone’s interested in. They’re gonna go to scrap if nobody wants, so make any offer, and I’ll take it…
